Tuesday, April 29, 2014

Backreferences Visual Studio Find/Replace regex

Here's another post of soemthing nifty that I want to remember later.

In Unity, I was getting an error: "CompareBaseObjectsInternal can only be called from the main thread"

It turned out, if you try to do  something of the form
 if( instance == null)  
in anything that isn't the main thread (or called by the main thread) you get an error because unity implements its own comparison operation that is not thread safe (and not documented anywhere.)

 The solution, which is pointed out elsewhere was to use C#'s Object.Reference.Equals function. Instead of going through every file (at this point, there's around 100 source files), I did a find and replace with regex.

I always seem to forget about backreferences (hence this post).

I needed to find every instance of  if( instance == null ) and replace it with if( ReferenceEquals(instance,null)) but for any variable name. Backreferences  in regular expressions seek to let you do just that.

My find string was this:

 if[^\S\r\n]*([^\S\r\n]*(?<var>.*)[^\S\r\n]*==[^\S\r\n]*null[^\S\r\n]*)  

ignoring all the whitespace chars, the string is this

 if ( (?<var>.*) == null )  

which basically says to save any string of characters into a backreference named 'var'

My replace string:
 if( ReferenceEquals(${var}, null) )  

then uses that backreference.

Find and Replacing in files found 75 instances where I had compared a variable (or some reference) directly to null. I did scroll through the whole list first, before I actually allowed it to replace.

Annoying problem, simple solution.


Friday, June 14, 2013

Network Connection between Unity 3.x and Unity 4.x

It can be done!
The trick is that both scenes need to have a network view with the same view ID. I can't figure out how to manually change the view ID since it is greyed out, but creating new network views changes the ID and once they match, it will work.

That's all. I'm just posting this to remember it later

Tuesday, October 30, 2012

Pumpkin Carving 2012, Man Of Steel

This year, my wife was out of town the Friday before Halloween. I put on Prometheus (and then Dune,and then Iron Man 2) and designed and carved a pumpkin.

I was inspired by this neat pumpkin I saw on imgur here. The premise was simple, just a silhouette of Batman with a glowing background. I wanted to use the same premise with a different superhero. Since very few superheroes have a distinct silhouette, I decided to do Superman with a lit up cape and lit up chest logo, on a glowing background.

Here's a link to the pdf pattern that I made in inkscape.

I originally made the pattern for the ThinkGeek pumpkin carving contest but after spending so long on the design, I really wanted to carve it.

After staying up late and many hours of painstaking scraping and gouging, here's my result.

Lit up with a lamp, inside, lights on.

Lit with lamp, lights off!

I was really happy with the end result. I spent a lot of time gouging the cape so that it would actually look 3D, like it was fluttering in the wind and I think it turned out well.
I'd love some constructive feedback!


Friday, October 12, 2012

Unity3d, Rotate around axis glitch with scale

For the record, Let me state that I'm posting this solely because I spent a LONG (2+wks) time debugging this problem and finally figured out what is going on. I've submitted a bug report to Unity3d, but in reality, I'm not entirely sure it's a glitch, because I can't figure out the expected behavior, and the Unity3d Rotate documentation is worthless.


This is my scenario, and I make no claims that this is the same for other situations:

I have a game object that is scaled to be -1, 1, 1 ( basically to mirror a model.) Inside of that object I have some child objects in a hierarchy :  Parent -> Child1 -> Child2.  Parent has a behavior script on it that uses both children. The goal is to make a non-trivial axis from the center of Child1 and rotate around that axis. Child2 should follow since of the hierarchy. The problem is that with the object scaled to -1 in the x direction, the rotation  doesn't work around the correct axis.


Here's the example. On the right side of the screen, there's the object with normal (1,1,1) scaling. The yellow debug line represents the rotation axis and the blue lines represent rotating the red sphere around that line (36 times, at 10degree intervals). As expected, the cone of lines has the axis in the center.

On the left side of the screen is the same object,but with scaling of (-1,1,1). With this scaling, the cone is clearly not along the axis. Now, in this case it's pretty clear that the cone is not around the axis, but in my actual project, the axis was nearly vertical, so instead of being way off, it was just slightly off and hard to debug.

Anyway, after some quick math and toying around, I decided to add a new debug line, that is the same axis but with scaling of (-1,1,1) applied to it. Here's the picture with that line turned on as well (in purple).


Visually the purple line seems to be correct on the left and the yellow line is correct on the right (and in my actual project I have means to verify it's exactly correct, not just visually.)


Here's some code:


void Start () {
   rotAxis = new Vector3(1,.5f,0);
            rotAxis.Normalize();
}
void Update () {
 shoulder.transform.rotation = Quaternion.identity;
        Debug.DrawLine(shoulder.transform.position, shoulder.transform.position + 11 * rotAxis, Color.yellow);

   for (int i = 0; i < 36; i++)
   {
       shoulder.transform.Rotate(rotAxis,10);
            Debug.DrawLine(shoulder.transform.position, elbow.transform.position, Color.blue);
   }

            Debug.DrawLine(shoulder.transform.position, shoulder.transform.position + new Vector3(-11 * rotAxis[0], 11 * rotAxis[1], 11 * rotAxis[2]), Color.magenta);
}


Basically I'm using Transform.rotate(axis, angle). So it seems to me, moral of the story is that if your parent object has scaling,  you need to apply the same scaling to a rotation axis. I'm not entirely sure what you should do if multiple parents have scaling, but my guess is that you'd have to apply all of those scalings, but that's my guess.

Anyway, I'm posting this just so I can find this again, and in case anyone else has the issue.

If you want to play with my example, here's the scene
RotateGlitch.zip
If you open the project and click play, it runs with the yellow line displayed, when you hit spacebar it also shows the purple scene.

Thursday, September 15, 2011

New Decor: 20$ Wall Art


Disclaimer: I've been trying to figure out how to write up this post for awhile because the wall art I made is heavily based on another person's work. I've decided that the best thing to do is be completely open about it and if the original artist wants me to take this down, then I will.  For the record, I'm okay with this post because I'm not ever intending to sale the wall art, its strictly for personal use.

I've been trying to find something to put over the couch for awhile. Our living room is very brown so I wanted some color. After browsing on Art.com I found this set and really liked it, but I just can't afford to spend 150$ on art right now. I had an idea to recreate this art with simple materials and cheaply.


I had this idea to cut some 12x12 wooden squares, paint them in fall colors, and then cut out standard white printer paper and  glue those on the wood, which is exactly what I did. I bought a four foot long 1x12 piece of wood and cut it into four equal pieces. I painted them with some acrylic paint, which surprisingly let the wood grain show through a little bit. After this dried I was a little disappointed with the colors, because they turned out a lot brighter than I hoped. I picked up an antiquing glaze at Lowe's and applied it to the wood. This stuff was magic. It rubs on as this dark green black oil but then when you wipe it off it leaves your colors looking aged. I started with the yellow board and almost was a bit worried when it was black green before I rubbed it out.  Once I wiped it off though, I really liked the look.


Before glaze, too bright    After glaze, much better!


For the silhouettes I made a pattern on the computer, printed it out and cut it out with an Xacto knife.  My plan was to use spray adhesive on the cutouts and then somehow get them to the wood and glue them on. I didn't have a solid plan here but accidentally discovered a neat method.  I had put the cutouts on some old cardstock before I sprayed the adhesive. Interestingly enough, the overspray was enough to hold the cutouts to the cardstock, which allowed me to easily transfer the cutout to the wood by just putting the cardstock on the wood, applying a little pressure and removing the cardstock. I'm pretty happy with the results.
After spraying with spray adhesive
I ended up hanging these with picture frame hanging wire. I just wrapped the wire around a machine screw, twisted it around, and then screwed in the screw. I did the same thing for the other side, screwing it in when the wire was pretty tight.  Here's a couple pictures of the process.


I hung these using a level and some nails and I love the result.  I really liked the final result and I'm keeping this idea around for future projects. 

Until next time, keep having fun!


Tuesday, September 13, 2011

New Decor: 5$ Coasters and Free Candlesticks

Although it might not be the most "manly" thing to do, decorating my new apartment has been a lot of fun. I've been trying to spend as little money as possible while creating a style that I like.  Making my own furniture allowed me to customize the look of my living room, but that's another post for another day. This will be the first in a series of posts about decorating my new apartment.


First up, candlesticks!  I saw a designer version of these  on pinterest sold by some store [perhaps pier1]. I instantly fell in love and had to make them. When I was home the other week, I raided my dad's stockpile of firewood and found a freshly cut pear log that would be perfect for this project. The log I started with was roughly 40 inches long and maybe 4 inches in diameter.  The first thing I did was to cut it into  three segments.  I actually did some math to figure out how to equally divide them. I calculated what one-sixth of my log was; then I used 3 sixths for the long piece, 2 sixths for the middle one, and 1 sixth for the small one.  Other than my scroll saw, I don't have a power saw up here, so I cut these by hand. I started cutting in a miter box and then used my trusty Fat Max hand saw to finish it off.


The next step proved to be much harder than I expected. I just wanted to drill a cylinder shaped hole into the top of the logs to hold the little tea-light candles. The internet suggested to me that if I wanted to have a flat bottomed hole, I should use a Forstner bit instead of the spade bit I would have normally used.


Forstner bit.Spade bit.

As you can see in these pictures, the forstner bit has a round blade and a razor edge along the bottom. The idea is that it cuts a hole out that has a flat bottom and a very small dent in the middle. The spade bit on the other hand has two horizontal blades and a sharp spike in the middle. This will cut a roughly cylindrical hole with a cone shaped dent in the bottom. Before this project I was really sure that I wanted as flat of a bottom in the hole as I could have, but now I've noticed that if there was a dent in the wood, it wouldn't matter at all.

In retrospect I would have just used a spade bit, because there turned out to be a lot of draw backs with the forstner bit. For starters, I really needed a drill press instead of a cordless drill, so that I could have drilled a straight hole. Second, the forstner bit makes a lot more contact with the wood at a time, so it goes a lot slower and gets a lot hotter. Third, the forstner bit has a round shaft which means my drill slipped on it a lot. At the end of the day,  I'd say if you can tolerate a bigger hole in the bottom of the cylinder you drilled, use a spade bit.

Anyway, back to the candlesticks- I used a forstner bit and it took me about 4 hours to drill the three holes. I'm happy with how it turned out but it was very very very frustrating trying to use the hand drill with the forstner bit.

But the final result turned out well [and manly!] with some apple spice candles.


These are yet another thing I saw on pinterest. In fact, these my have even had a blog attached with them, but I just saw the picture and had a pretty good idea how to make them.  I bought a roll of sisal rope at Lowe's and got some cork circles at Hobby Lobby.  The secret to these: hot glue. I probably went through 2-3 glue sticks per coaster. I started at the outside and then coiled the rope in a couple inches at a time, gluing it to the cork and any rope that was already there. I cut the rope right at the middle and stuffed it in. 


Here's a final picture tying it all together.


Well thats all for now, until next time, have fun!

Saturday, September 3, 2011

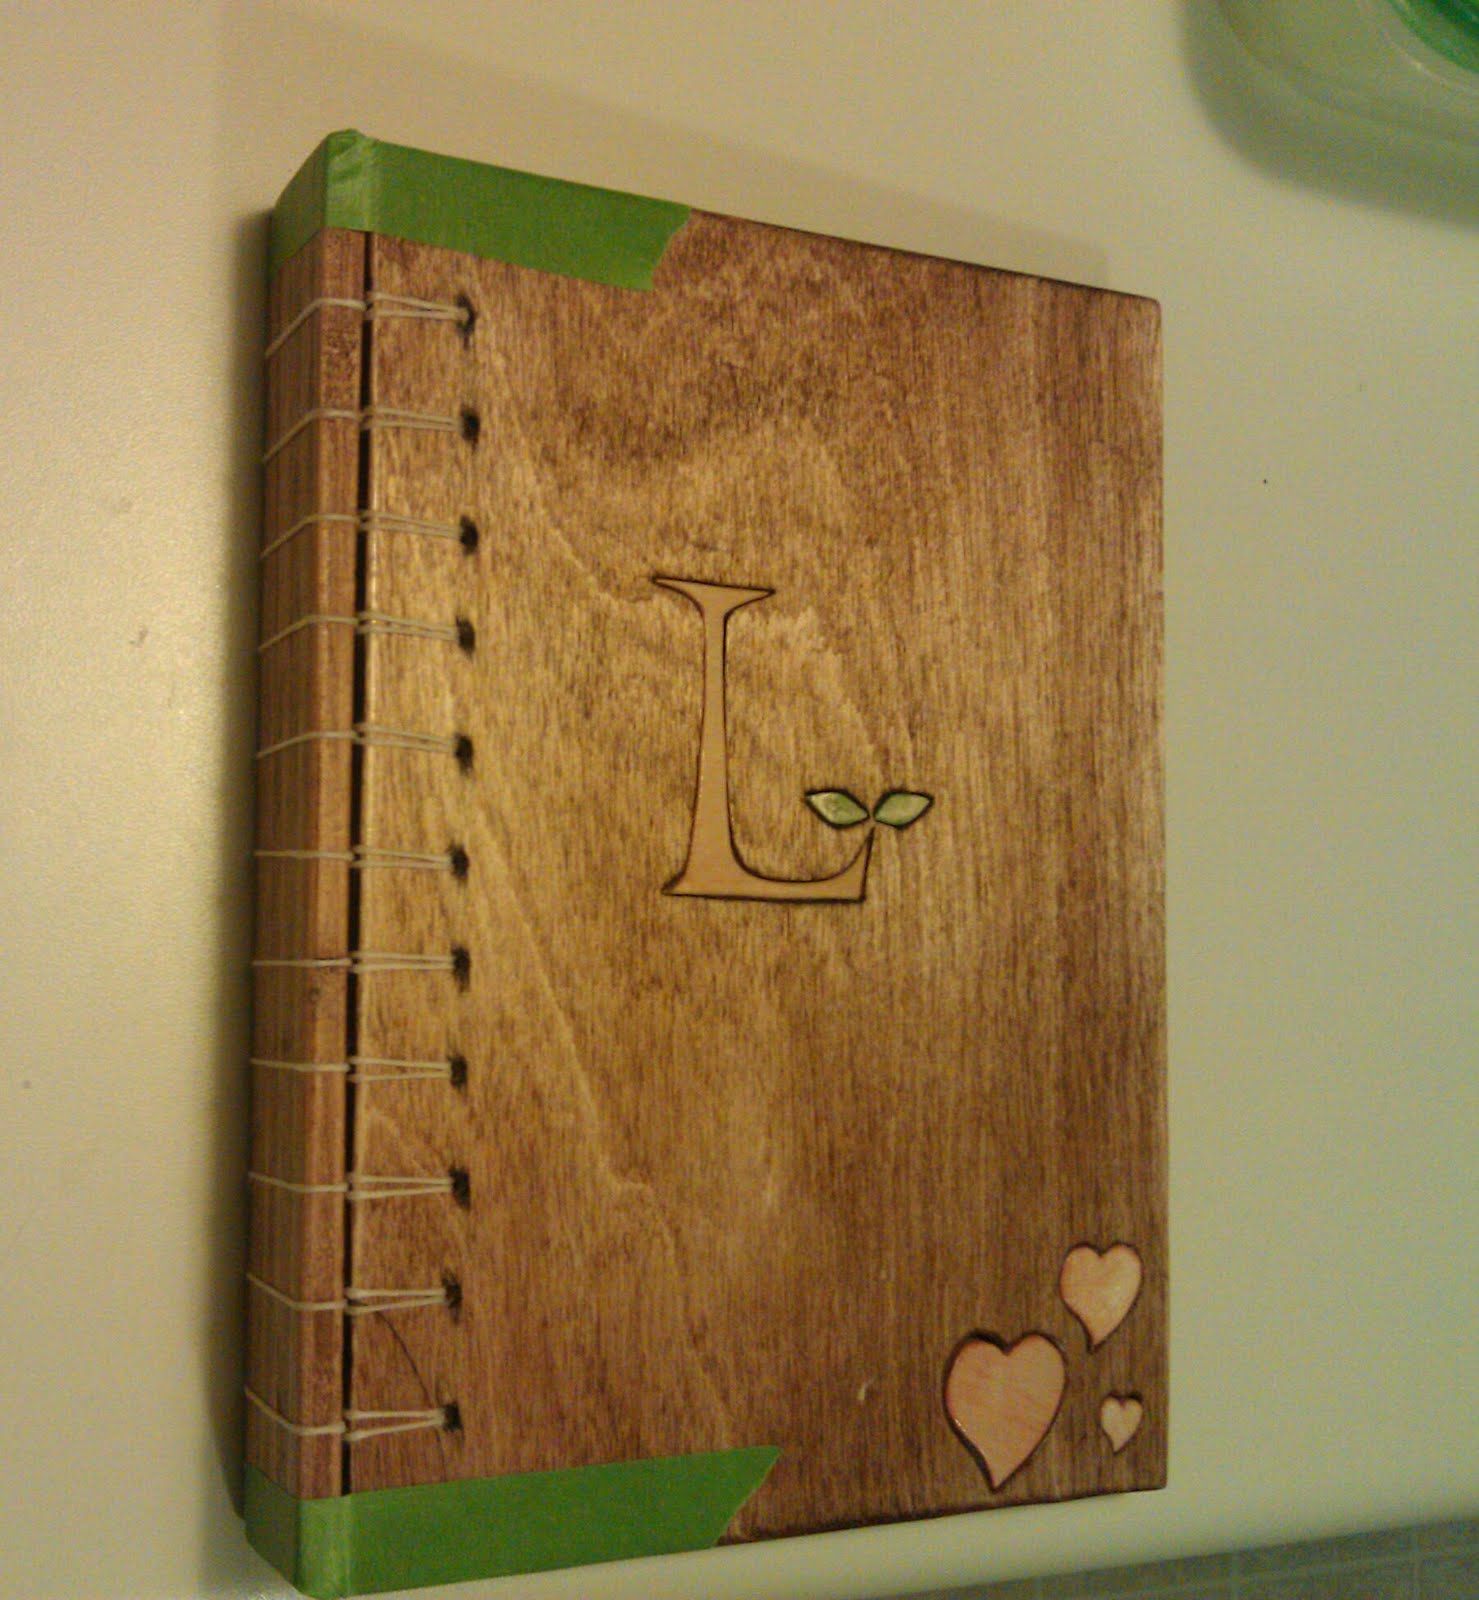
Project "Belgium" - Wooden book for Lauren

A couple weeks ago, I discovered Pinterest - a virtual pinboard of everything awesome. Basically the idea is that if you see something on a blog or website you can make a "pin" of it and share it with the world. You can organize your pins onto different boards and keep up with ideas. If you're interested, here's all of my pinboards. One day while I was on pinterest, I saw a post about book binding/making and I was intrigued. I promptly researched book binding and made a new board focused on bookmaking [which is here]  At this point, I decided that I was going to make a book for Lauren.

My favorite bookbinding method that I found was the "Secret Belgian Binding" which actually yields a book with a spine, instead of just front and back covers.  I decided to step it up a little bit and make a book that had wooden covers, since I've been itching to use my scrollsaw recently.  I drew up this pattern in Illustrator and then let started picking out wood. I had a scrap piece of 1/4" baltic birch plywood. It sounds fancy but its really just the stuff I bought at Hobby Lobby awhile ago. Yay Hobby Lobby!

Anyway, I printed the pattern [black outlines, not this colored version] and cut out the pieces. I cut the holes out  and then cut all the shapes out separately. After cutting all the pieces, I stained the pieces to get different colors. I had a bunch of stain on hand from when I was testing out colors for my furniture, so I actually had the shades that I wanted. The L was stained with some Minwax "Golden Oak",  the leaves were done in the same Behr stain that I used for Lauren's Coasters and the Hearts were done in some kind of Minwax maple stain.

By the way, this is a perfect example- ALWAYS test your stain colors before using them. The maple stain was supposed to be a nice warm golden color...as you can see in these photos, it was very pink on pine. For this project, the pink worked out. For anything else though, that pink would have been disastrous


Once the stain dried I glued the pieces into the holes.  For this project, the little gaps didn't matter so I didn't bother filling them in. I drilled holes in the covers and then polyurethaned them and the spine.  I followed the Belgian Book Binding instructions from here.  I used 5 sheets cream colored paper folded in half per signature and I also added some green cardstock inside both covers. I used waxed linen string for the binding.

If you're curious, I attached the green cardstock to the cover using spray adhesive and I made the pages look a little homemade by running a razor along the edges of the paper.


And now for some pictures:


I'm really happy with how this turned out and Lauren seemed to enjoy it.  Now I'm going to head to bed because I've got terrible headache. Hope everyone has a good weekend!